En construcción Inicio: 09/01/2021
Estreno-aprox: 15/02/2021
% Avance:
10 Fundamentos que todo desarrollador Front-End debe dominar
En el mundo del desarrollo web, muchos profesionales han logrado
destacar navegando por este vasto océano de tecnologías, lenguajes y
frameworks. Aunque han tenido éxito, una parte considerable de
desarrolladores aún percibe que gran parte de su trabajo funciona como
Arte de Magia, lo cual desde una perspectiva
holística de la Ingeniería de Software no es
lo ideal.
Dominar conceptos fundamentales como:
"¿Cómo funciona realmente el motor de JavaScript?",
"¿Qué estructuras de datos utilizar y cuándo?" o
"¿Cómo manejar el asincronismo en JavaScript?" puede
marcar la diferencia entre un desarrollador competente y uno
excepcional.
En este artículo encontrarás fundamentos que quizás conoces
superficialmente, pero es momento de profundizar. Te presento los
10 Fundamentos que todo desarrollador Front-End debe dominar.
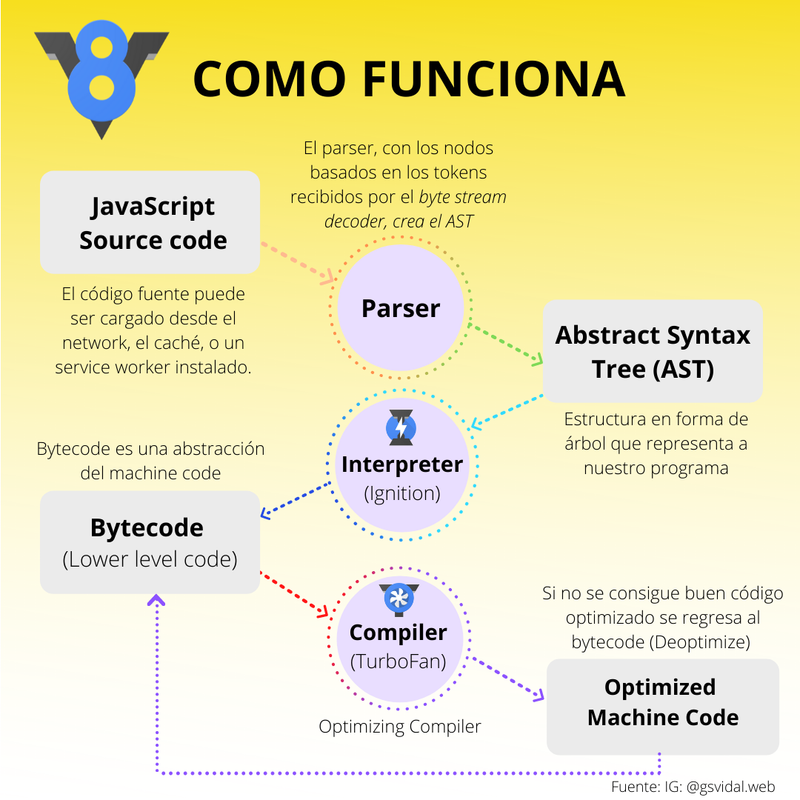
Como desarrolladores web, es bueno conocer los fundamentos del
lenguaje Javascript y de su motor, este último con el fin de
comprender como a partir de un lenguaje que los humanos podemos
entender, se llega a convertir en algo que las maquinas pueden
comprender y ejecutar.
Diferentes Motores de Javascript
Cada navegador tiene su propio motor de javascript, entre los más
conocidos tenemos los siguientes:
Definición y distintos motores de JavaScript
Revisaremos uno de los más utilizados, el V8 de Chrome:
V8 Chrome Engine
Pero ¿cómo funciona?, veamos todo el recorrido que hace nuestro
código en Javascript desde nuestro editor de código hasta que
sirve a su propósito.
Funcionamiento del motor V8 de Chrome
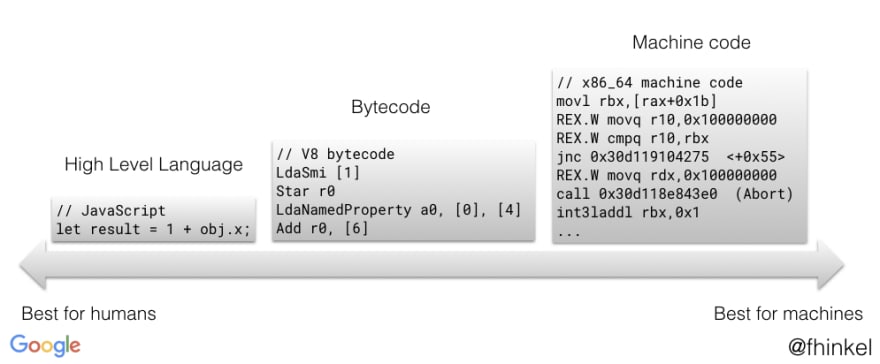
Mostremos en código el bytecode y el machine code:
Es el contexto de ejecución, en el cual los valores y expresiones
son visibles o pueden ser referenciados, scopes pueden ser
colocados en jerarquía, así el hijo o scope interno (inner scope)
tiene acceso al padre o scope externo (outer scope), pero no
viceversa. Scope es definido en tiempo de parseo.
Ámbito Léxico / Lexical Scope
Se basa en el lugar donde una variable fue declarada para
determinar dónde esta variable estará disponible. Las funciones
anidadas tienen acceso a las variables declaradas en su ámbito
exterior.
Pasemos a ver unos ejemplos de scope, pero con la siguiente
pregunta en mente:
¿Cómo funciona realmente Javascript?
              //Exercise 1
              let a = 3;
              function addTwo(x) {
                let ret = x + 2;
                return ret;
              }
              let b = addTwo(a);
              console.log(b);
              //5

              //The compiler asks the global scope manager(gsm) if already exists a variable named "a", the gsm doesn't find it, so it creates it. then assigns to it the aritmethic expression, a literal value of 3, after that the gsm has a new request for creating a variable named addTwo, as it doesn't exists yet, it's created and is assigned to it a function definition. Still in the global scope a b variable is also created and assign for now an undefined, in that line, occurs a call expression addTwo() the gsm check if it exits in that scope and there it is, so executes it sending an a argument, so a is also checked and its value is 3 in the global scope, so the addTwo function have a parameter x, so it's created in the local execution context, and it's assigned the value of 3, so x = 3; then a ret variable is created in the function execution context and it's assign to it a binary expression (x + 2), the x = 3 and 2; 5 is assigned to ret, the next line is a return statement and finish the function, the 5 is returned when it's called and immediately the function instance as well as its local execution context and its variables (x, ret) are destroyed by the garbage colector.
              //Then again in the global scope the b variable is assigned with the 5 returned. and finally it's put to the console the value of b (5).


              //Exercise 2
              //Here we can see the lexical scope definition in practice:
              //Lexical scope is when a function can access a variable declared in its outer scope(next outer scope and so on)
              //Or when a variable defined outside a function can be accessible inside that function

              //Lexical scope / Ambito Léxico / Scope Chain
              let val1 = 2;
              function multiplyThis(n) {
                let ret = n * val1;
                return ret;
              }
              let multiplied = multiplyThis(6);
              console.log('example of scope:', multiplied);
              //example of scope: 12


              //Exercise 3
              //A function that returns a function example is essential to understand closures
              let val = 7;
              function createAdder() {
                function addNumbers(a, b) {
                  let ret = a + b;
                  return ret;
                }
                return addNumbers;
              }
              let adder = createAdder();
              let sum = adder(val, 8);
              console.log('example of function returning a function:', sum);
              //example of function returning a function: 15


              // Line 55: We declare a variable val in the global execution context and assign the value 7 to that variable

              // Line 56: We declare a variable named createAdder and we assign a function definition to it (we put "function" before createAdder) all this happens int the global exection context, we have to remember that whatever is between the curly brackets {} is not executed, not even evalated, just stored the function definition into a variable for future use

              // Line 63: we declare a new variable, named adder in the global execution context, temporarily, undefined is assigned to adder. , we see round brackets() so we need to execute or call the function. let's query the gec's memory and look for a variable named createrAdder, it was created  before so let's call it.

              // Line 56: a new local execution context is created.the engine adds the new context to the call MediaStreamTrack, the function has no arguments, so let's jump right into the body of it.

              // Line 57-60, we have a new function declaration, we create the variable addNumbers in the local execution context( addNumbers just exists in this lec) and assign a function definition to it (function addNumber) , we store the function definition in the local variable named addNumber.

              // Line 61: We return the content of the variable addNumbers. The engine looks for a variable named addNumbers and finds it. It's a function definition, it's ok because this function(addNumbers) can return anything, including another function definition, so it return addNumbers definition- anything between the brackets on lines 58 and 59 makes up the function definition, we also remove the local execution context from the call stack.

              // After return, the lec is destroyed , the addNumbers variable doesn't exist anymore. the function definition still exists though, it was returned from the createAdder function and assigned to the variable adder, which was previously created.

              // Now in line 64, we define a new sum variable in the gec/global scope, we assign undefined to it.

              // Then we need to execute a function, the function named adder, we look it up in the global scope/gec and we find it, this function takes two parameters

              // Let's retrieve these parameteres, so we can call the function (with the correct arguments) and pass it, remember that the addNumbers function definition was assigned to adder because of that we call adder(2 parameters), in this case val was defined before and the second parameter is 8

              // Now we have to execute that function (adder), a new local execution context (local scope) is created. Within the lec two new variables are created: a and b. they were assigned the values 7 and 8, as the arguments we passed before

              //A new variable is declared, name ret, it's declared in the lec, its value is set to undefined. Then an adition is performed, where we add the content of variable a and b, the result (15) is assigned to the ret variable

              // After that ret is returned, the lec is destroyed , it is removed from the call stack, the variables a, b and ret no longer exist.

              // The returned value is assigned to the variable named sum

              // We print out the value of sum to the console.


              // Finally we'll see a closure:
              function createCounter() {
                let counter = 0;
                const myFunction = function() {
                  counter = counter + 1;
                  return counter;
                }
                return myFunction;
              }
              const increment = createCounter();
              const c1 = increment();
              const c2 = increment();
              const c3 = increment();
              console.log('example increment:', c1, c2, c3);
              //example increment: 1 2 3


              //Line 101: The compiler finds a formal variable declaration with a function definition attach to it, then asks the global scope manager if the creatCounter variable exists, but the gsm says doesn't find any, so the compiler produce code that at execution time ask to create a new variable called students in that scope bucket.

              // Everything inside the createCounter function (beetween the curly brackets) it's not going to be processed yet (but it was already parsed- to make the AST). In modern web browser this is known as lazy compiling, it's going to be compiled when it's executed(called/invocked)

              //Now we are going to shorten the explanation

              //Line 109: An increment variable is going to be created in the global scope and then assigned a createCounter(), the "()" means that we call that function, so we find that variable declared and defined at line 101, a new local execturion context is created (a function scope).

              //Line 102: a counter variable is created in the createCounter scope and we assign the 0 to it.

              //Line 103: a MyFunction variable is declared and has a function definition assign to it, WE ALSO CREATE A CLOSURE AND INCLUDE IT AS PART OF THE FUNCTION DEFINITION. THE CLOSURE CAONTAINES THE VARIABLES THAT ARE IN SCOPE, IN THEIS CASE THE VARIABLE counter.

              //Everything from line 104 to 105 is not proccesed yet.

              //Line 107: we have a return statement , and the variable MyFunction is returned, the local scope manager is asked if the myFunction variable already exists, and the answer is yes, so because it has a function definition attached to it, it will return  the function definition (whatever is from line 104 to 105) and its closure. The garbage collector takes care of the local scopes and local variables created until now.

              //Next we assign line 104-105 to the increment variable; so now that function definition is not labeled myFunction anymore, now is called increment and has a function definition including its closure.

              //Line 110: a c1 variable is created in the global scope and is assigned a callingExpression increment(), Now we are going to execute line 104-105, so it is created a increment local scope when a counter variables is checked, before looking in the local and global scope, let's check the CLOSURE, it contains the variable named counter, and after the expression in line 104, its value is set to 1, now the closure contains counter with its value 1.

              //The counter value is returned (1) and it's assigned to c1

              //Line 111: We repeat steps in line 133, c2 gets assigned 2

              //Line 112: We repeat steps in line 133, c2 gets assigned 3.

              //Line 113: The content of variables c1, c2 and c3 is logged in console.

              //So now we understand how closures works, the key to remember is that when a function gets declared, it contains a function definition and a closure. The closure is a collection of all the variables in the function's scope.

              // This works even in the global scope, yes it is created a closure as well but since these functions were created in the global scope, they have access to all the variables in the global scope, and the closure concept is not that relevant


              //Another example with 2 functions returned (two closures), we'll see the same effect
              let glob = "g";
              function f1() {
                  let loc = "l";
                  glob = glob + loc;
                  function f2() {
                    let loc2 = "l2";
                    function f3() {
                        loc2 = loc2 + loc + glob;
                        return loc2;
                    }
                    return f3;
                  }
                  return f2;
              }
              const g1 = f1();
              const g2 = g1();
              const c1 = g2();
              const c2 = g2();
              console.log(c1); //l2lgl
              console.log(c2); //l2lgllgl


              //Bibliography:

              // Olivier De Meulder,"I never understood javascript closures.", Medium, https://medium.com/dailyjs/i-never-understood-javascript-closures-9663703368e8

              //Simpson, Kyle. You Don't Know JS Yet: Scope & Closures

              //MDN, Scope, https://developer.mozilla.org/en-US/docs/Glossary/Scope
Closures
Como ya vimos en el ejemplo práctico lineas arriba, un closure es
formado por una función y es la combinación de la definición de
esta función, así como su ámbito léxico que comprenden las
variables locales definidas en este scope.
El asincronismo en JavaScript permite que el código se ejecute sin
bloquear el hilo principal, permitiendo que múltiples operaciones
se ejecuten concurrentemente. Esto es fundamental para crear
aplicaciones web responsivas y eficientes.
Callbacks
Los callbacks son funciones que se pasan como argumentos a otras
funciones y se ejecutan en un momento posterior. Aunque son la
base del asincronismo en JavaScript, pueden llevar al "Callback
Hell" cuando se anidan múltiples operaciones asíncronas.
Promises
Las Promises representan el resultado eventual de una operación
asíncrona. Tienen tres estados: pending, fulfilled y rejected.
Permiten un manejo más elegante del código asíncrono y evitan el
anidamiento excesivo de callbacks.
Async/Await
Async/await es una sintaxis más moderna y legible para trabajar
con Promises. La palabra clave 'async' hace que una función
retorne una Promise, mientras que 'await' pausa la ejecución hasta
que la Promise se resuelve, haciendo que el código asíncrono se
vea y comporte como código síncrono.
Event Loop
El Event Loop es el mecanismo que permite que JavaScript maneje
operaciones asíncronas. Monitorea la Call Stack y la Callback
Queue, moviendo funciones de la cola al stack cuando este está
vacío, permitiendo la ejecución no bloqueante de JavaScript.
Los objetos en JavaScript son colecciones de propiedades, donde
cada propiedad es una asociación entre un nombre (clave) y un
valor. Son fundamentales para organizar y estructurar datos de
manera lógica, permitiendo crear representaciones de entidades del
mundo real en código.
Creación de Objetos
Existen múltiples formas de crear objetos en JavaScript:
Object Literal: La forma más común y directa
Constructor Object(): Usando la función
constructora
Object.create(): Creando con un prototipo
específico
Factory Functions: Funciones que retornan
objetos
Constructor Functions: Para crear múltiples
instancias
Propiedades y Métodos
Las propiedades pueden contener valores primitivos (string,
number, boolean) o valores complejos (funciones, arrays, otros
objetos). Cuando una propiedad contiene una función, se denomina
método. Los métodos permiten que los objetos tengan
comportamiento, no solo datos.
Acceso a Propiedades
JavaScript ofrece dos formas principales de acceder a las
propiedades:
Dot Notation: objeto.propiedad
Bracket Notation: objeto['propiedad']
La bracket notation es especialmente útil cuando el nombre de la
propiedad se almacena en una variable o contiene caracteres
especiales.
Prototipos y Herencia
JavaScript utiliza prototipos para implementar herencia. Cada
objeto tiene una propiedad interna llamada [[Prototype]] que
apunta a otro objeto. Cuando se accede a una propiedad que no
existe en el objeto, JavaScript busca en la cadena de prototipos
hasta encontrarla o llegar a null.
Métodos Útiles para Objetos
JavaScript proporciona varios métodos estáticos para trabajar con
objetos:
Object.keys(): Retorna un array con las claves
del objeto
Object.values(): Retorna un array con los
valores del objeto
Object.entries(): Retorna un array de pares
[clave, valor]
Object.assign(): Copia propiedades de un objeto
a otro
Object.freeze(): Hace que un objeto sea
inmutable
Object.seal(): Previene la adición de nuevas
propiedades
Destructuring y Spread Operator
Las características modernas de JavaScript facilitan el trabajo
con objetos:
Destructuring: Extraer propiedades en variables
individuales
Spread Operator (...): Copiar y combinar
objetos
Rest Parameters: Capturar propiedades restantes
Mejores Prácticas
Para trabajar eficientemente con objetos:
Usar nombres descriptivos para propiedades y métodos
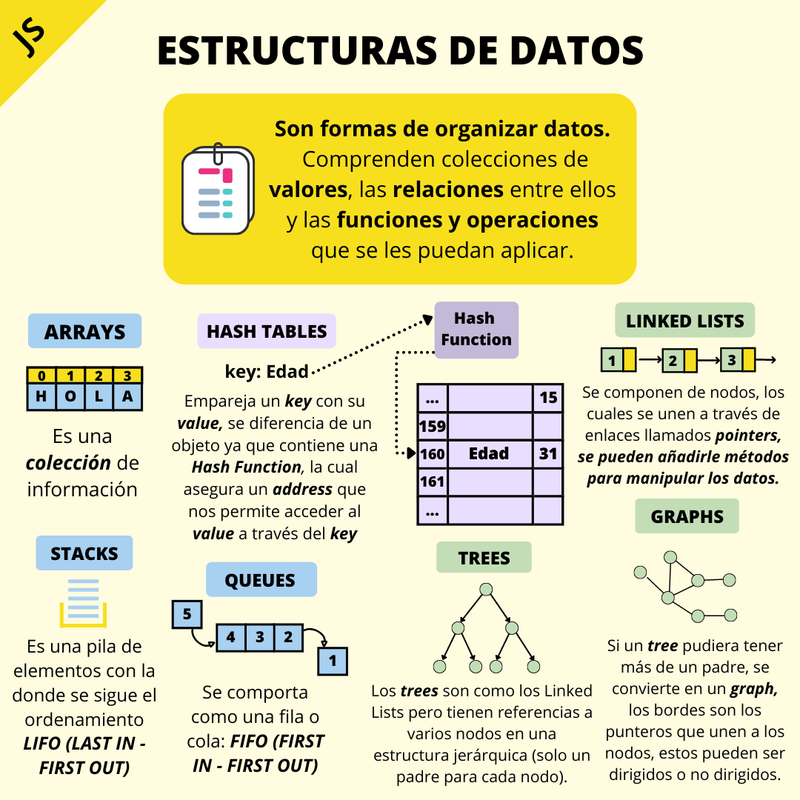
Según Wikipedia una
estructura de datos
es una forma particular de organizar datos en una computadora para
que puedan ser utilizados de manera eficiente.
También podemos definirla como una forma de organizar datos.
Comprenden colecciones de valores, las relaciones entre ellos y las
funciones y operaciones que se les puedan aplicar.
El uso "eficiente" que se le dará dependerá del motivo a necesitar
cierta estructura de datos. Quizás necesitemos una estructura donde
se requiere una búsqueda rápida de elementos, o una inserción
eficiente, etc, todo dependerá de que aplicación estemos haciendo.
Aquí entra un tema importante: la complejidad.
La Complejidad
Este término hace referencia a como se expresan las ventajas y
desventajas que tiene cada estructura de datos al utilizarse en un
problema en particular. La complejidad se puede expresar en 2 ejes:
El
espacio y el tiempo.
El espacio
La complejidad del espacio representa el consumo de
memoria de una estructura de datos.
El tiempo
La complejidad del tiempo se necesita expresar para
varias operaciones que se puede usar en estructuras de datos, tales
como insertar(agregar), eliminar, buscar y/ o acceder elementos.
Principales tipos de Estructuras de Datos
Podemos agrupar estas estructuras en 3 diferentes tipos:
Las estructuras del tipo-Array, como los
Arrays, Stacks y
Queues las cuales se diferencian principalmente
en la forma de insertar y remover elementos de ellas.
Las Hash Tables dependen de
hash functions para localizar y guardar información.
Linked Lists, Trees y
Graphs son estructuras con nodos que
guardan referencias con otros nodos.
¿Quieres ver el código .js de todas estas estructuras de datos?.
Puedes encontrarlo en GitHub en el repositorio
Data Structures-JS
Arrays
Los Arrays(arreglos) son una colección de elementos, los cuales son
emparejados con un key(índice), la forma más básica de esta
estructura es el array lineal(array unidimensional).
Los arrays son una de las estructuras más antiguas e importantes,
así como de las más utilizadas en casi toda aplicación.
Creo que todos hemos utilizado un array en JavaScript, tan solo
inicializándolo así:
var array1 = [1,3,4,5,7];
Pero ya que estamos en el fundamento de: Estructura de Datos,
vamos a crear una clase MyArray y en ella, crear métodos para
buscar, agregar, remover valores del array. En pocas palabras
veremos como crear desde cero métodos similares a los
built-in methods .push(), .pop(), unshift(), .shift(), etc.
*Podemos utilizar el Inspector de elementos para trabajar esto, lo
que nos da el siguiente output:
Como vemos esa estructura está vacía, tiene un lenght de 0 y no
contiene data.
Ahora creemos unos cuantos métodos para poder hacer
operaciones sobre nuestro array. Los crearemos dentro de nuestra
clase MyArray, previamente creada:
 class MyArray {
   constructor() {
     this.length = 0;
     this.data = {};
   }
   //Nuestro método get devuelve el valor del elemento con índice index
   get(index) {
     return this.data[index];
   }
   //Nuestro método push añade un valor al final del array
   push(item) {
     this.data[this.length] = item;
     this.length++;
     return this.data;
   }
   //Nuestro método pop remueve el último elemento del array
   pop() {
     const lastItem = this.data[this.length - 1];
     delete this.data[this.length -1];
     this.length--;
   }
   //Nuestro método delete elimina el elemento de indice index y devuelve el elemento removido.
   delete(index) {
     const item = this.data[index];
     this.shiftIndex(index);
     return item;
   }
   shiftIndex(index) {
     for(let i = index; i < this.length - 1; i++) {
       this.data[i] = this.data[i + 1];
     }
     delete this.data[this.length - 1];
     this.length--;
   }
   //Nuestro método unshiftItem añade un elemento(item) al inicio de nuestro array y devuelve la longitud del array
   unshiftItem(item) {
     this.length++;
     this.unshiftIndex();
     this.data[0] = item;

     return this.length;
   }
   unshiftIndex() {
     for(let i = this.length - 1; i > 0 ; i--) {
       this.data[i] = this.data[i-1];
     }
   }
   //Para nuestro método shiftItem vamos a remover el primer elemento de nuestro array, usaremos el método delete() creado anteriormente.
   shiftItem() {
     return this.delete(0);
   }
 }
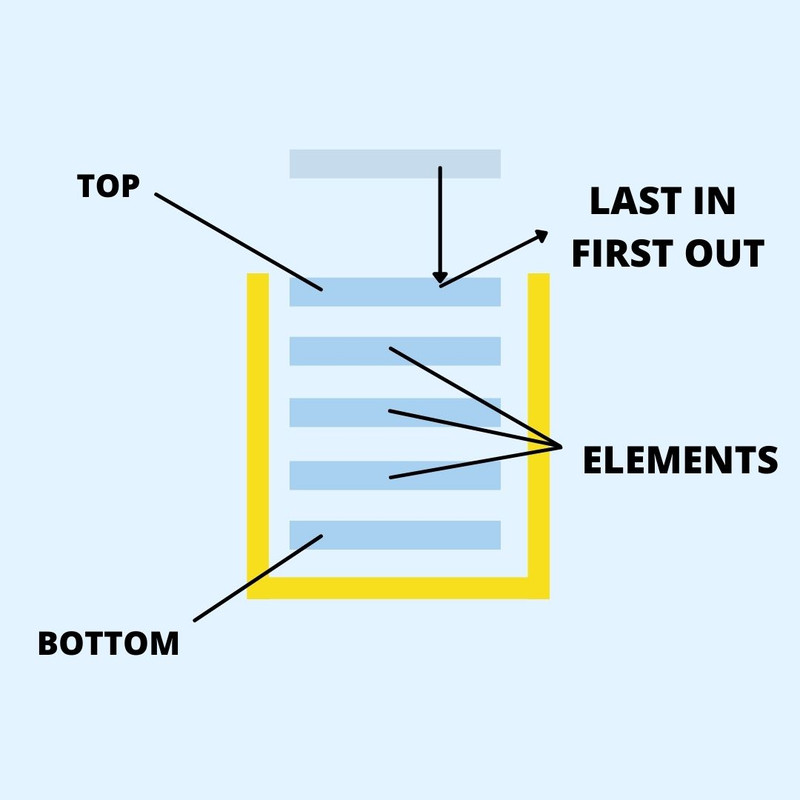
Stacks
Los stacks(pilas) son también una colección de
elementos, están apilados y cuenta con 3 operaciones principales,
peek(), push() y pop(), la forma en que se añaden y remueven
elementos es a través del ordenamiento LIFO(Last in, first out), es
decir el último que entra es el primero que sale. Un ejemplo
práctico y conocido de un stack es el call stack.
Diagrama de un stack
Ahora pasemos a lo interesante, crearemos un stack usando clases
como en el caso del array.
Pero antes de eso expliquemos el concepto de nodos, que
utilizaremos a lo largo del tema de estructura de datos, y si bien
mencionamos que los Linked Lists, Trees y Graphs son estructuras
basadas en nodos, también podemos tratar a cada elemento del stack(y
más adelante al queue), como un nodo que tiene un valor(value) y que
tiene una referencia a través de un puntero al siguiente elemento(el
próximo en entrar).
 //Creamos una clase Node(nodo) para no repetir código en los métodos
 class Node {
   constructor(value) {
     this.value = value;
     this.next = null;
   }
 }

class Stack {
  constructor() {
    this.top = null;
    this.bottom = null;
    this.length = 0;
  }
  //Nuestro método peek nos devuelve el elemento top(último en ingresar)
  peek() {
    return this.top;
  }
  //Nuestro método push agrega un elemento al (top) del stack y nos devuelve el stack
  push(value) {
    const newNode = new Node(value);
    if(this.length === 0) {
      this.top = newNode;
      this.bottom = this.top;
    } else {
      const holdingPointer = newNode;
      this.top.next = holdingPointer;
      this.top = holdingPointer;
    }
    this.length++;

    return this;
  }
  //Nuestro método pop remueve el elemento top y nos devuelve el stack
  pop() {
    var penultimo = myStack.bottom;
    for(let i = 0; i < this.length-2; i++) {
      penultimo = penultimo.next;
    }

    this.top = penultimo;
    this.top.next = null;
    this.length--;

    return this;
  }
}
//Instanciamos la clase Stack
const myStack = new Stack();
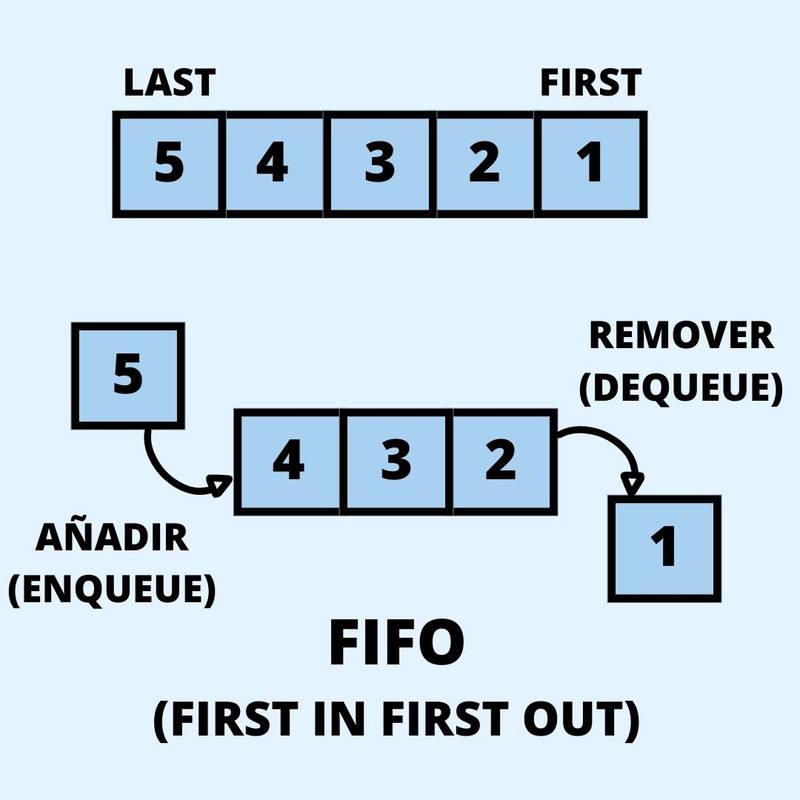
Queues
Los queues son colas, sus operaciones
principales son agregar elementos al final de la cola(enqueue) y
remover el primer elemento de la cola (dequeue), usa el protocolo
FIFO (First in First Out), lo que significa que el primero que entra
a la cola, es el primero que sale al remover un elemento.
Diagrama de un Queue
Veamos el código:
//Creamos una clase Node(nodo) para no repetir código en los métodos
class Node {
  constructor(value) {
    this.value = value;
    this.next = null;
  }
}

class Queue {
  constructor() {
    this.first = null;
    this.last = null;
    this.length = 0;
  }
  //Nuestro método peek nos devuelve el elemento first(primero en la cola)
  peek() {
    return this.first;
  }
  //Con nuestro método enqueue agregaremos un elemento al final de la cola (last)
  enqueue(value) {
    const newNode = new Node(value);
    if(this.length === 0) {
      this.first = newNode;
      this.last = newNode;
    } else {
      this.last.next = newNode;
      this.last = newNode;
    }
    this.length++;

    return this;
  }
  //Con nuestro método dequeue removeremos el primer elemento de la cola
  dequeue() {
    if(this.length !== 0) {
    const second = myQueue.first.next;
    this.first = second;
    this.length--;

    return this;
    } else {
      console.log("Queue is empty, you cannot dequeue!")
    }
  }

}
//Instanciamos la clase Queue
const myQueue = new Queue();
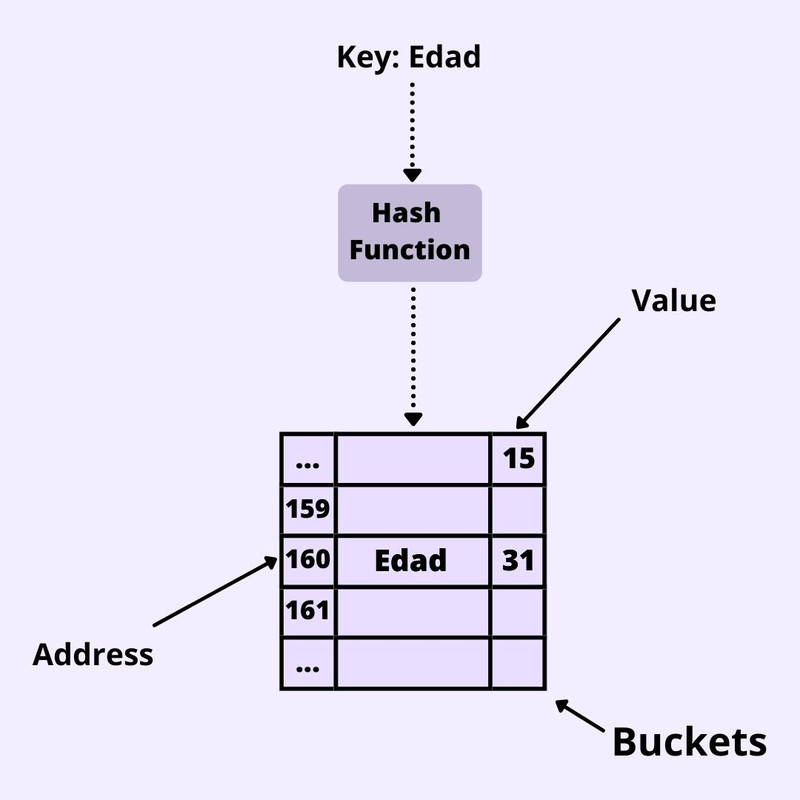
Hash Tables
Un Hash Table es una estructura de datos usada para
implementar un array asociativo, donde se puede emparejar
keys y values. Es similar a un objeto de JavaScript,
con la diferencia que la hash table tiene un
Hash Function que determina en que lugar de la
memoria se ubicarán estos datos. Esta Hash Function recibe como
argumento al key y retorna la dirección(address) de la locación en
donde estará esta información. Pueden existir colisiones, lo
que significa que puede haber dos keys diferentes para un mismo
address, pero con el método set que veremos más adelante al enviar
como parámetro al key, nos devolverá su value respectivo.
Diagrama de Hash Table
 class HashTable {
   constructor(size) {
     this.data = new Array(size);
   }
   //Lo siguiente es un Hash Function que fue creado arbitrariamente,existen muchos Hash Functions en GitHub
   hashMethod(key) {
    let hash = 0;
    for (let i = 0; i < key.length; i++) {
      hash = (hash + key.charCodeAt(i) * i) % this.data.length;
    }
    return hash;
   }
   //El metodo set nos inserta un elemento con su key y value(puede haber colisiones)
   set(key, value) {
    const address = this.hashMethod(key);
    if (!this.data[address]) {
      this.data[address] = [];
    }
    this.data[address].push([key, value]);
    return this.data;
   }
   //El metodo get nos devuelve el valor que le corresponde al key, en caso no exista el key enviado nos devolverá undefined
   get(key) {
    const address = this.hashMethod(key);
    const currentBucket = this.data[address];
    if (currentBucket) {
      for (let i = 0; i < currentBucket.length; i++) {
        if (currentBucket[i][0] === key) {
          return currentBucket[i][1];
        }
      }
    }
    return undefined;
   }
 }
 //Instanciamos el HashTable con 50 espacios libres
 const myHashTable = new HashTable(50);
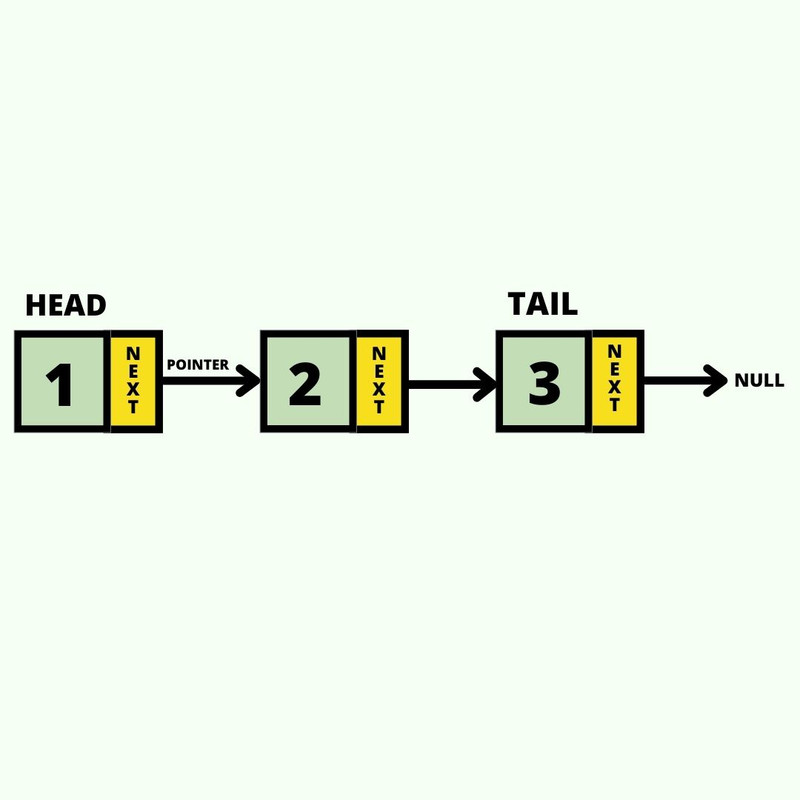
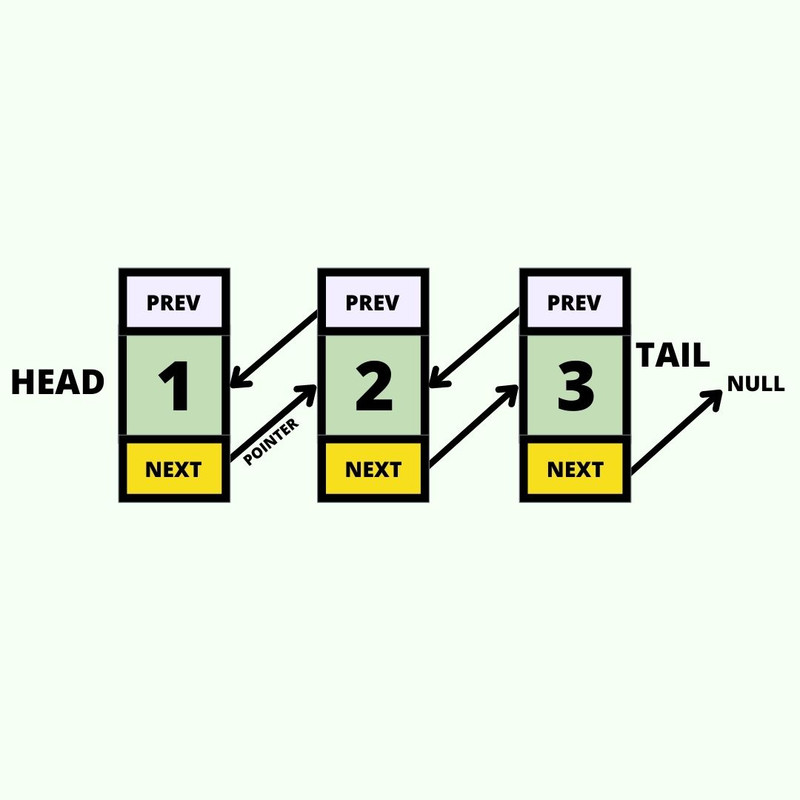
Linked Lists
Los Linked Lists almacenan data en forma
secuencial, pero en lugar de mantener índices, mantienen
pointers(punteros) a otros elementos. El primer nodo es
llamado head y el último nodo
tail.
Existen dos tipos de linked list:
Singly Linked List:
Cada nodo tiene solo un puntero hacia el siguiente nodo
(next).
Doubly Linked List:
En este caso además del next, cada nodo tiene un puntero
adicional hacia el nodo previo(prev).
Diagrama de un Singly Linked List
Diagrama de un Doubly Linked List
Démosle un vistazo al código: Singly Linked List:
//Creamos una clase Node(nodo) para no repetir código en los métodos
 class Node {
   constructor(value) {
     this.value = value;
     this.next = null;
   }
 }

 class MySinglyLinkedList {
   constructor(value) {
     this.head = {
       value: value,
       next: null
     }
     this.tail = this.head;
     this.length = 1;
   }
   //Nuestro método append agregará un elemento al final(tail) del Singly Linked List
   append(value) {
     const newNode = new Node(value);
     this.tail.next = newNode;
     this.tail = newNode;
     this.length++;

     return this;
   }
   //Nuestro método prepend agregará un elemento al inicio(head) del Singly Linked List
   prepend(value) {
     const newNode = new Node(value);
     newNode.next = this.head;
     this.head = newNode;

     this.length++;
   }
   //Nuestro método insert insertará un elemento con índice index en el Singly Linked List
   insert(index, value) {
     if(index >= this.length) {
       console.log("No hay suficientes elementos, será enviado al final");
       return this.append(value);
     }

     const newNode = new Node(value);
     const firstPointer = this.getTheIndex(index - 1);
     //Se crea una const holdingPointer que servirá para no perder el puntero next del firstPointer.
     const holdingPointer = firstPointer.next;
     firstPointer.next = newNode;
     newNode.next = holdingPointer;

     this.length++;

     return this;
   }

   getTheIndex(index) {
     let currentNode = this.head;

     for(let counter = 0; counter < this.length; counter++) {
       if(counter !== index) {
         currentNode = currentNode.next;
       } else{
         return currentNode;
       }
     }
   }
 }
 //Instanciando MySinglyLinkedList:
 let myLinkedList = new MySinglyLinkedList(1;
Doubly Linked List:
//Como podremos ver el código para el doubly linked list solo se diferencia por ser unas cuantas líneas más larga:

class Node {
  constructor(value) {
    this.value = value;
    this.next = null;
    this.prev = null;
  }
}

class MyDoublyLinkedList {
  constructor(value) {
    this.head = {
      value: value,
      next: null,
      // Doubly: se añade la siguiente linea
      prev: null,
    };
    this.tail = this.head;

    this.length = 1;
  }
  append(value) {
    const newNode = new Node(value);
    newNode.prev = this.tail;
    this.tail.next = newNode;
    this.tail = newNode;
    this.length++;

    return this;
  }
  prepend(value) {
    const newNode = new Node(value);
    // Doubly: se añade la siguiente linea
    this.head.prev = newNode;

    newNode.next = this.head;
    this.head = newNode;

    this.length++;
  }
  insert(index, value) {
    if(index >= this.length) {
      console.log("No hay suficientes elementos, será enviado al final");
      return this.append(value);
    }

    const newNode = new Node(value);
    let firstPointer = this.getTheIndex(index - 1);
    let secondPointer = this.getTheIndex(index);
    let holdingPointer = firstPointer.next;
    firstPointer.next = newNode;
    newNode.next = holdingPointer;
    // Doubly: se añaden las siguientes 3 líneas
    holdingPointer.prev = newNode;
    firstPointer = newNode.prev;
    holdingPointer = secondPointer;

    this.length++;

    return this;

  }

  getTheIndex(index) {

    let currentNode = this.head;

    for(let counter = 0; counter < this.length; counter++) {
      if(counter !== index) {
        currentNode = currentNode.next;
      } else{
        return currentNode;
      }
    }
  }

}
//Instanciando MyDoublyLinkedList:
let myDoublyLinkedList = new MyDoublyLinkedList(1);
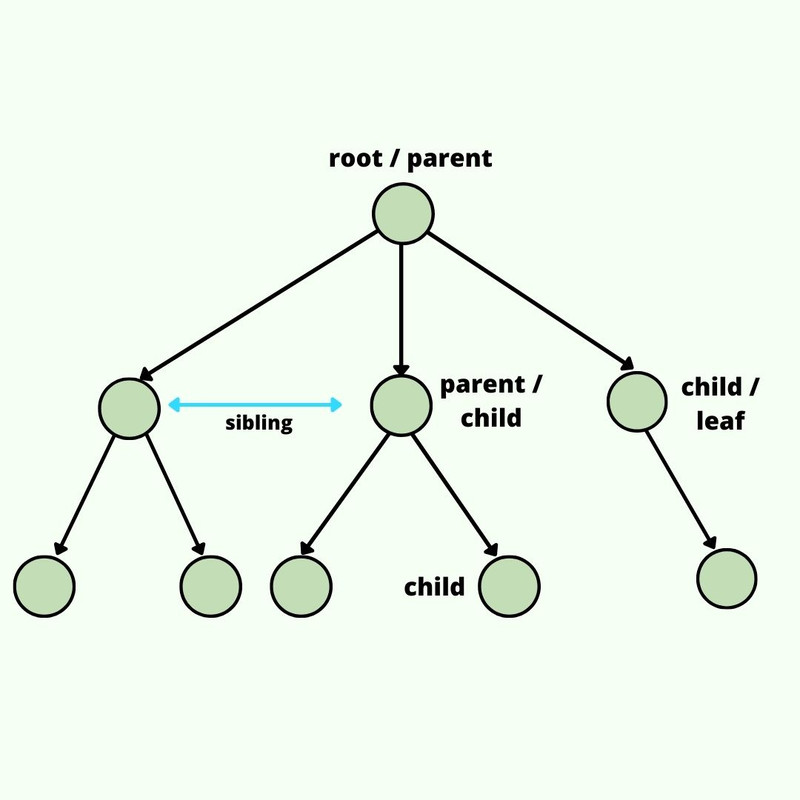
Trees
Una estructura de datos en forma de árbol o
Tree simula una estructura de árbol jerárquica, con
un nodo padre, un valor root e hijos(children). Cada nodo contiene
un valor y una referencia a su(s) hijo(s).
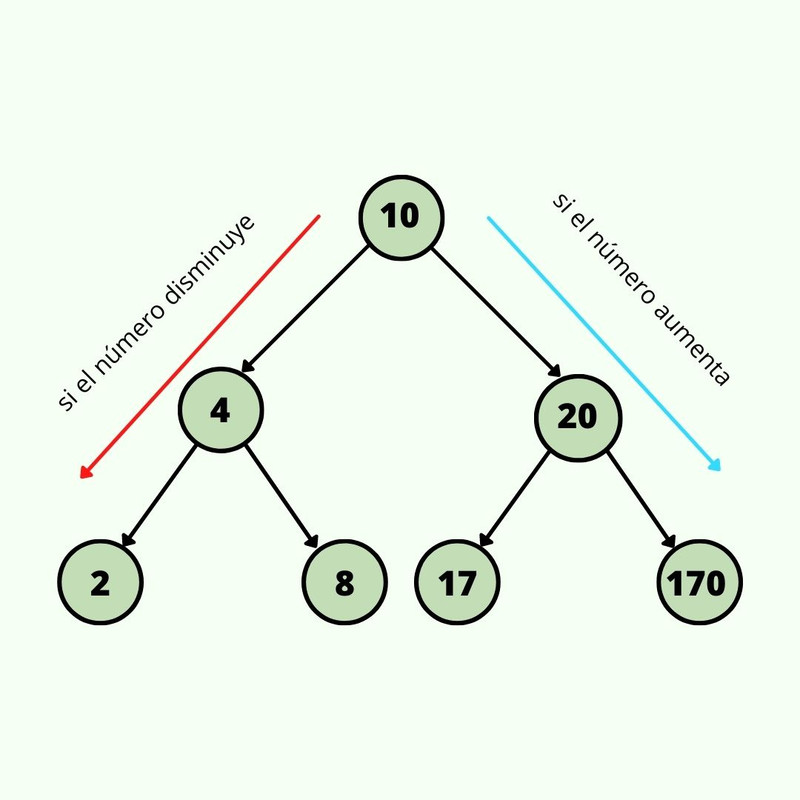
En este caso veremos un Binary Search Tree, un tipo de Tree usado
para insertar y buscar valores en la estructura. Un Binary Searh
Tree consta de un root donde a partir de este elemento se inicia la
búsqueda, cada elemento solo puede tener dos
descendientes(children), los children que son mayores que el
elemento padre se colocan debajo del padre pero al lado derecho y
los menores al lado izquierdo.
Diagrama de un Tree
Diagrama de un Binary Search Tree
Ahora sí, para este código, armaremos el binary search tree de
arriba.
  class Node {
    constructor(value) {
      this.left = null;
      this.right = null;
      this.value = value;
    }
  }

  class BinarySearchTree {
    constructor() {
      this.root = null;
    }
    //Con este método insert, podremos agregar nodos con sus valores y referencias según la condición si son menor o mayor al padre.
    insert(value) {
      const newNode = new Node(value);
      if(this.root === null) {
        this.root = newNode;
      } else {
        let currentNode = this.root;
        while(true) {
          if(value < currentNode.value) {
            if(!currentNode.left) {
              currentNode.left = newNode;
              return this;
            }
            currentNode = currentNode.left;
          } else {
            if(!currentNode.right) {
              currentNode.right = newNode;
              return this;
            }
            currentNode = currentNode.right;
          }
        }
      }
    }
    //El método search nos permitirá devolver el nodo en el que se encuentra el valor(value) enviado como argumento. Recordar que el nodo es el conjunto de información como: value, left child, right child. En caso de recorrerse el binary search tree y no encontrar el valor buscado nos indicará que no existe el valor.
    search(value) {
      var msj = "no se encuentra el valor";
      if(this.root === null) {
        console.log(`The tree is empty!`);
      } else {
        let currentNode = this.root;
         while(true) {
          if(value === currentNode.value) {
            return currentNode;
          } else {
            if(value < currentNode.value) {
              if(currentNode.left) {
                currentNode = currentNode.left;
              } else {
                return msj;
              }
            } else {
              if(currentNode.right) {
                currentNode = currentNode.right;
              } else {
                return msj;
              }
            }
          }

         }
        }
    }
  }
  //Instanciamos BinarySearchTree
  const myBinarySearchTree = new BinarySearchTree();
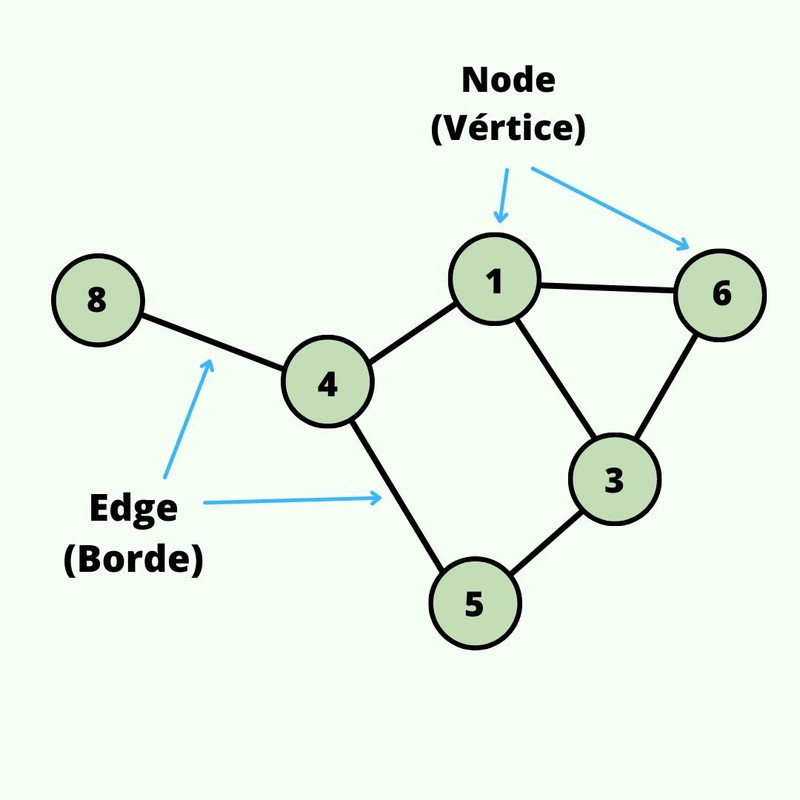
Graphs
Los grafos o Graphs consisten en una colección
finita de vertices(nodos) unidos por bordes(edges), existen varios
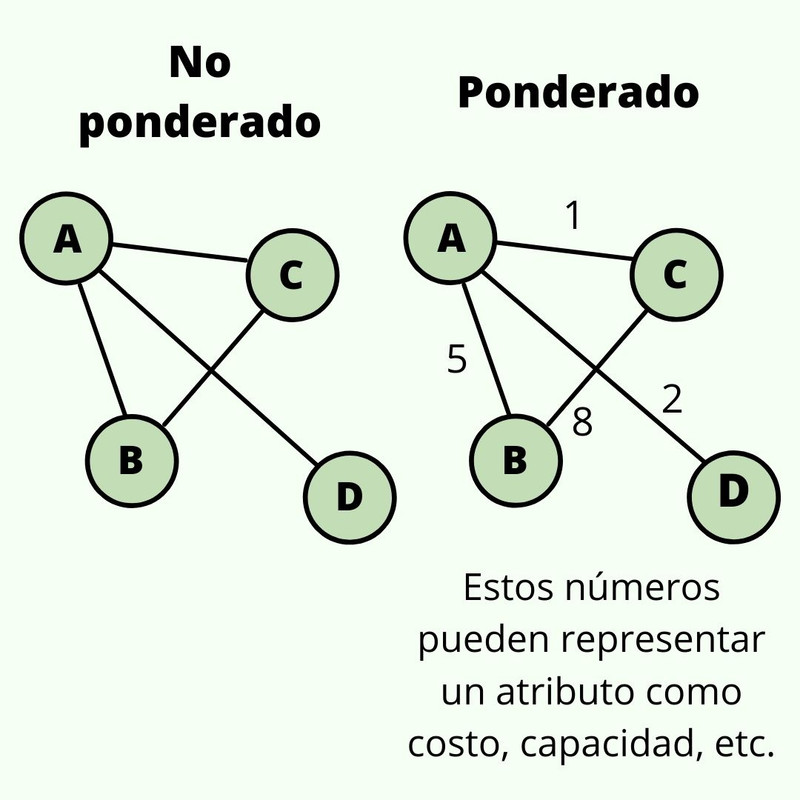
tipos de grafos, según diferentes criterios:
Diagrama de un Graph
Tipos de Graph: Ponderado y no ponderado
Tipos de Graph: Cíclico y acíclico
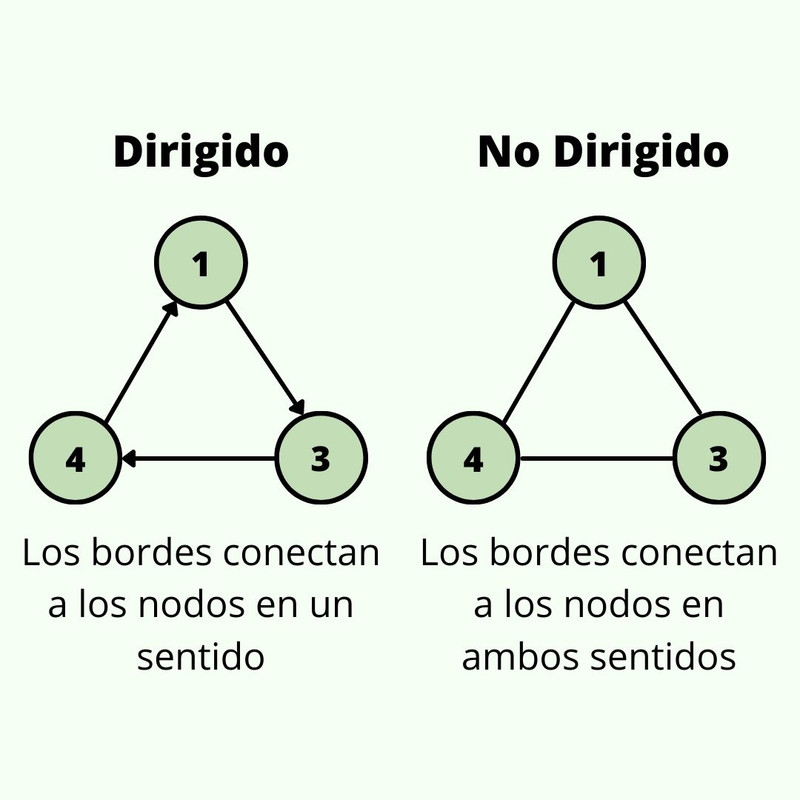
Tipos de Graph: Dirigido y no dirigido
Existen varias maneras de representar un grafo, pero 2 de las
principales son:
Lista de Adyacencia:
Para cada vértice, se almacena una lista de vértices adyacentes.
Matriz de Adyacencia:
La información es almacenada en una matriz bidimensional, en la
cual las filas representan los vértices y las columnas
representan los vértices a donde apuntan, la información en los
bordes y vértices deben almacenarse externamente.
Para el código usaremos la representación con lista adjacente, del
tipo no dirigido, y usaremos la forma y nodos del grafo de la
imagen:
Diagrama de un Graph.
 class Graph {
   constructor() {
     this.nodes = 0;
     this.adjacentList = {};
   }
   //Se agregan nodos(vértices)
   addVertex(node) {
     this.adjacentList[node] = [];
     this.nodes++;
   }
   //Se agregan bordes(edges) pasando como argumentos a nodos(nodo1 y nodo2), el grafo del ejercicio es del tipo no dirigido, así que debe colocarse el método push en ambas direcciones.
   addEdge(node1, node2) {
     this.adjacentList[node1].push(node2);
     this.adjacentList[node2].push(node1);
   }
 }

 const myGraph = new Graph();

 //Creamos los vértices(nodos):
 myGraph.addVertex(1);
 myGraph.addVertex(3);
 myGraph.addVertex(4);
 myGraph.addVertex(5);
 myGraph.addVertex(6);
 myGraph.addVertex(8);

 //Creamos los Edges(bordes), ya que hay 7 bordes en el gráfico, deben haber 7 addEdge:
 myGraph.addEdge(8,4);
 myGraph.addEdge(4,5);
 myGraph.addEdge(4,1);
 myGraph.addEdge(1,6);
 myGraph.addEdge(3,6);
 myGraph.addEdge(1,3);
 myGraph.addEdge(5,3);
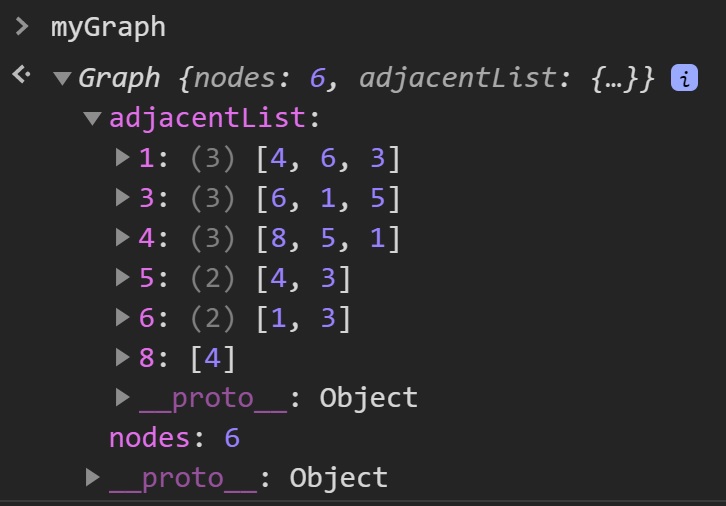
Comparemos el output luego de ingresar el código:
Grafo a construir
Output en el Inspector de Elementos-Consola
Como vemos en el output, al llamar a myGraph en su
adjacentList nos muestra los nodos y sus respectivos nodos unidos
por bordes, por ejemplo el nodo 1 tiene como nodos adyacentes(unidos
por un borde) a los nodos 4,6 y 3. Lo cual es rápidamente
verificable viendo el diagrama del grafo
Conclusiones
Existen muchas más estructuras de datos las cuales responden de una
mejor o no tan eficiente manera al uso que se les quiera dar,
algunas resaltan por su eficiencia en tiempo de búsqueda, otras por
la forma de insertar o remover elementos, aquí entra en juego la
habilidad y experiencia del desarrollador/ingeniero para saber
cuando y por qué usar una estructura de datos en particular.
Las formas de crear las estructuras de datos de este artículo es una
de tantas maneras de llegar al mismo resultado o similar, esta vez
se usó clases, pero también se puede crear con funciones.
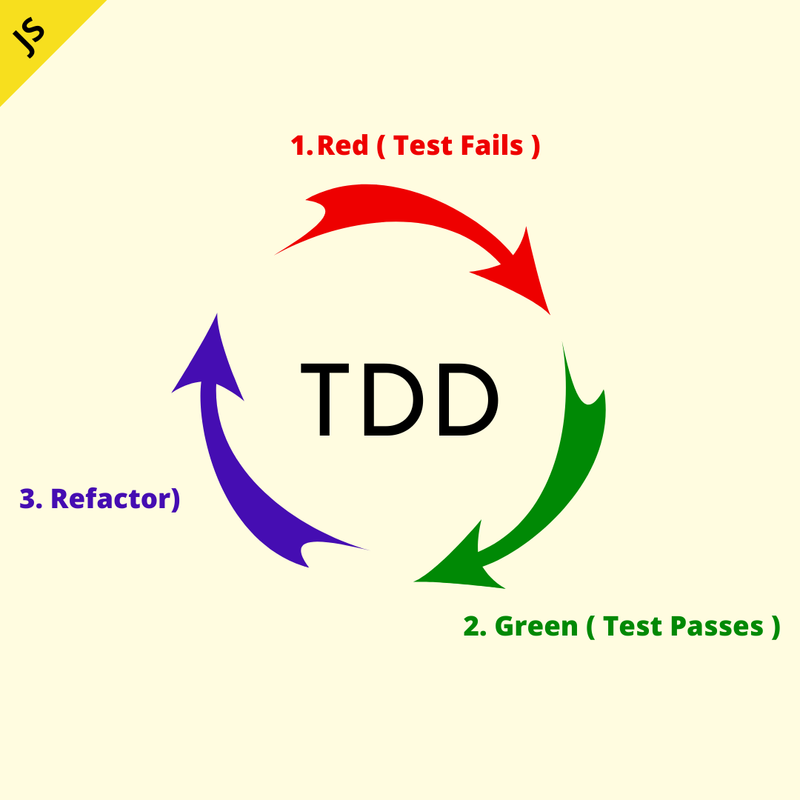
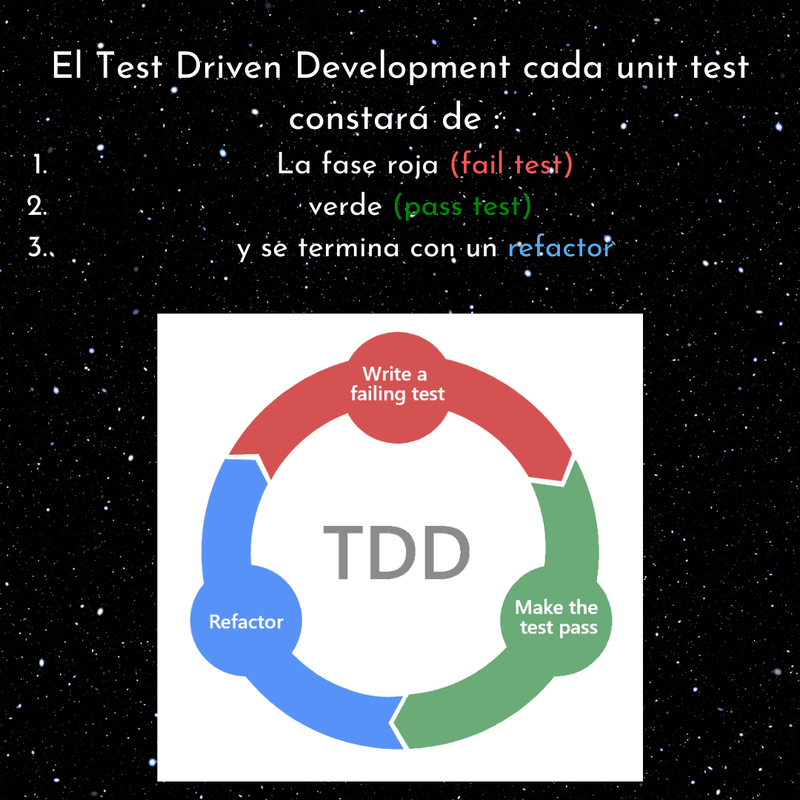
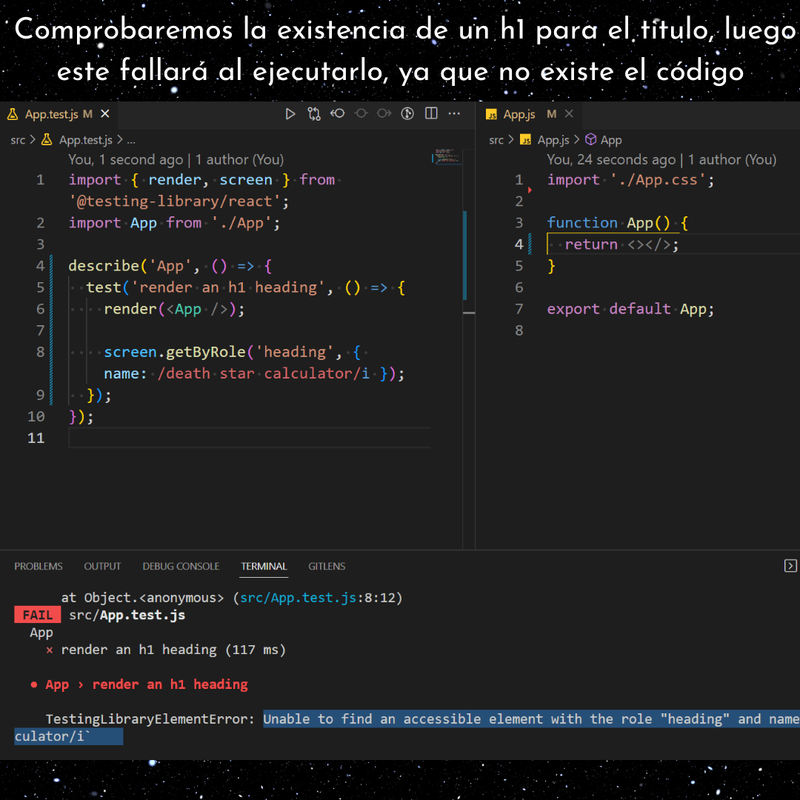
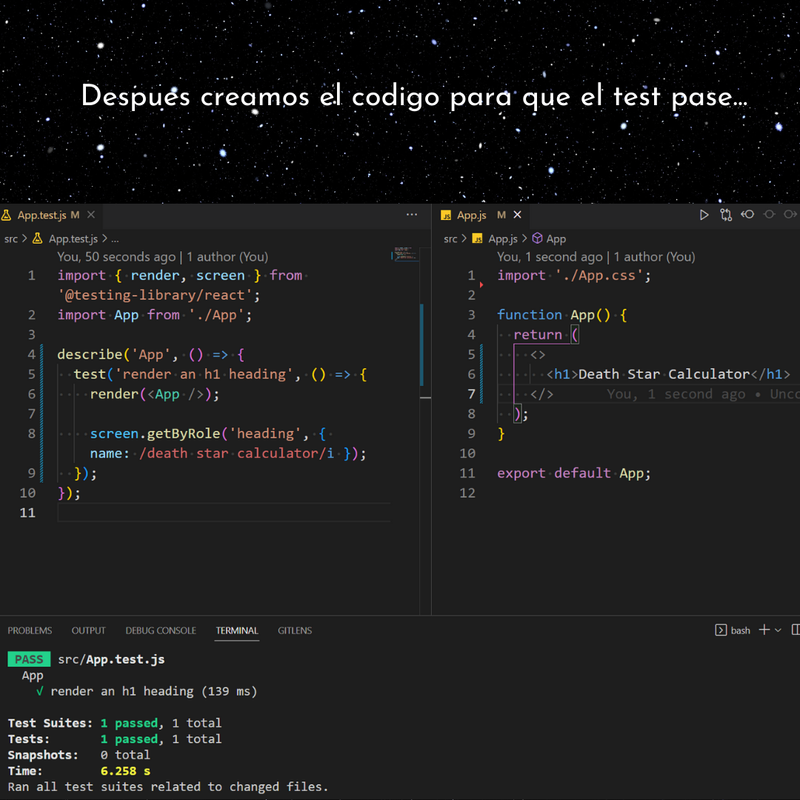
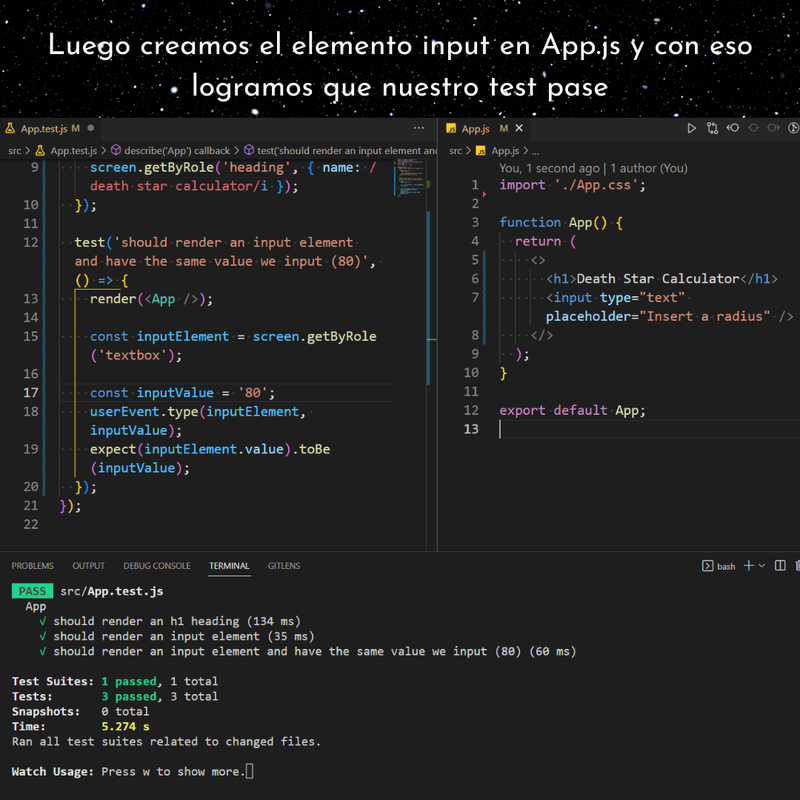
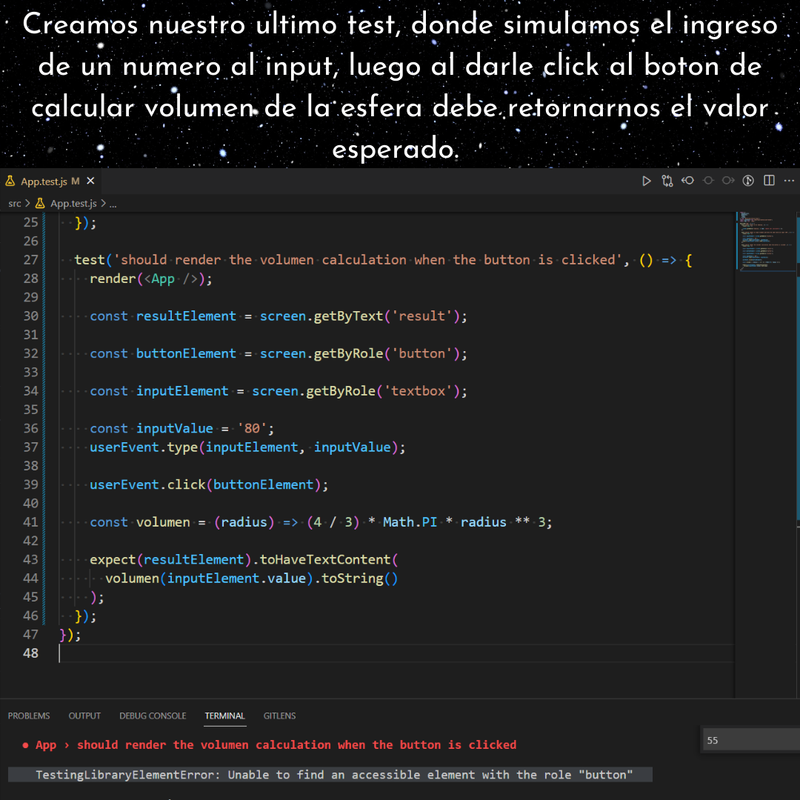
Es un proceso en el cual se hacen los tests antes del codigo, se
basa en el ciclo red, green, refactor, donde red(rojo) es hacer un
test que falla(debe fallar), luego en la fase green(verde),
creamos el codigo necesario para que el test pase, y en la ultima
fase, refactor, el codigo puede ser mejorado/optimizado.
Ciclo TDD
Beneficios
Testing se convierte en parte del desarrollo
Mayormente hacer tests se siente como una tarea pesada, por lo
cual al aplicar TDD, los tests se convierten en parte del
desarrollo.
Escribiremos código más limpio
Cuando aplicamos TDD, solemos escribir el mínimo código posible
para hacer que el código pase.
Se reducen los bugs
Al usar TDD se escriben mas tests, lo cual tiende a reducir el
numero de bugs.
Reglas del juego
Existe una versión corta con 2 reglas basadas en las propuestas
por Uncle Bob:
Escribe solo lo necesario para que un unit test falle.
Escribe solo suficiente codigo para hacer que el test que falló,
pase.
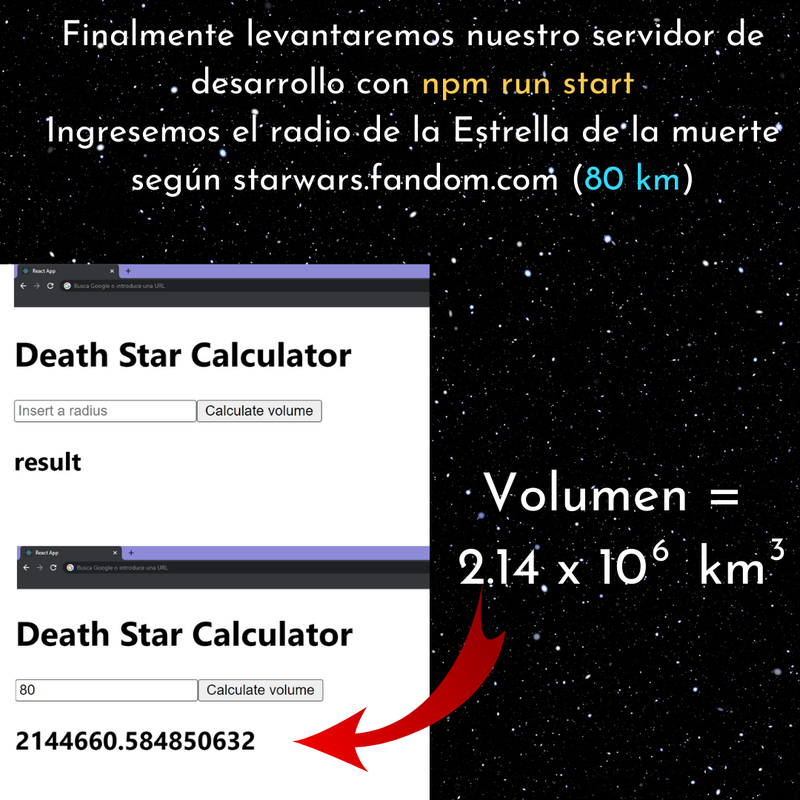
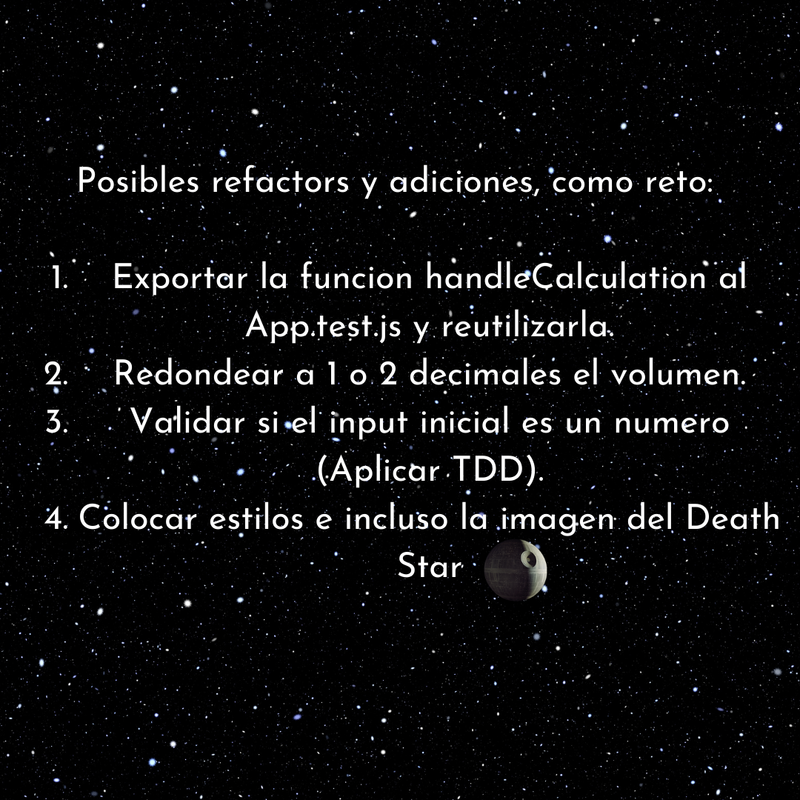
Ejercicio: Aplicación en React para calcular el volumen de una
esfera:
Las etiquetas HTML son elementos fundamentales que estructuran y
dan significado al contenido web. Conocer su anatomía es esencial
para escribir código semántico, accesible y mantenible.
Estructura Básica de una Etiqueta
Una etiqueta HTML completa consta de varios componentes:
Etiqueta de apertura: <nombre>
Atributos: Propiedades que modifican el
comportamiento
Contenido: Texto, elementos anidados o datos
Etiqueta de cierre: </nombre>
Tipos de Etiquetas
Existen diferentes tipos de etiquetas según su comportamiento:
Etiquetas de bloque: Ocupan todo el ancho
disponible
Etiquetas en línea: Solo ocupan el espacio
necesario
Etiquetas auto-cerradas: No requieren etiqueta
de cierre
Etiquetas semánticas: Proporcionan significado
al contenido
HTML semántico utiliza etiquetas que describen el significado del
contenido, no solo su apariencia. Esto mejora la accesibilidad,
SEO y mantenibilidad del código, proporcionando estructura clara
tanto para humanos como para máquinas.
Etiquetas Semánticas Principales
Las etiquetas semánticas más importantes para estructurar
contenido:
<header>: Encabezado de la página o
sección
<nav>: Navegación principal del sitio
<main>: Contenido principal único en la
página
<section>: Sección temática del documento
<article>: Contenido independiente y
reutilizable
<aside>: Contenido relacionado pero
secundario
<footer>: Pie de página o sección
Etiquetas de Contenido
Para estructurar el contenido dentro de las secciones:
<h1>-<h6>: Jerarquía de encabezados
<p>: Párrafos de texto
<figure> y <figcaption>: Imágenes
con descripción
<blockquote>: Citas textuales
<time>: Fechas y horas
<address>: Información de contacto
Beneficios del HTML Semántico
El uso correcto de HTML semántico proporciona múltiples ventajas:
Accesibilidad: Mejor experiencia para lectores
de pantalla
SEO: Los motores de búsqueda entienden mejor el
contenido
Mantenibilidad: Código más fácil de leer y
modificar
Rendimiento: Navegadores pueden optimizar la
renderización
Futuro: Compatibilidad con nuevas tecnologías
web
Mejores Prácticas
Para implementar HTML semántico correctamente:
Usar una jerarquía lógica de encabezados (h1, h2, h3...)
Evitar el uso excesivo de divs cuando hay etiquetas semánticas
El parseo HTML es el proceso mediante el cual el navegador
convierte el código HTML en un árbol de objetos (DOM) que puede
ser manipulado y renderizado. Comprender este proceso es
fundamental para optimizar el rendimiento y evitar problemas de
renderizado.
Fases del Proceso de Parseo
El parseo HTML ocurre en varias etapas secuenciales:
Tokenización: División del HTML en tokens
Construcción del árbol: Creación del DOM
Análisis de dependencias: Identificación de
recursos
Renderizado: Generación de la representación
visual
Tokenización
Durante la tokenización, el navegador:
Identifica etiquetas de apertura y cierre
Reconoce atributos y sus valores
Procesa contenido de texto
Maneja comentarios y doctypes
Construcción del DOM
El navegador construye el DOM siguiendo reglas específicas:
Stack de elementos abiertos: Rastrea etiquetas
no cerradas
Corrección automática: Cierra etiquetas
faltantes
Anidamiento correcto: Mantiene la jerarquía
apropiada
Elementos especiales: Maneja elementos
auto-cerrados
Optimizaciones del Navegador
Los navegadores modernos implementan optimizaciones:
Parseo incremental: Procesa HTML mientras se
descarga
Preload de recursos: Descarga recursos críticos
temprano
Los atributos de accesibilidad permiten que las tecnologías
asistivas como lectores de pantalla comprendan mejor el contenido
y la estructura de una página web. Son fundamentales para crear
experiencias inclusivas que funcionen para todos los usuarios,
independientemente de sus capacidades.
Atributos ARIA Esenciales
Los atributos ARIA (Accessible Rich Internet Applications)
proporcionan información semántica adicional:
<!-- Roles para definir el propósito del elemento -->
<div role="button" tabindex="0">Botón personalizado</div>
<div role="alert" aria-live="polite">Mensaje importante</div>

<!-- Estados y propiedades -->
<button aria-expanded="false" aria-controls="menu">
  Menú desplegable
</button>
<div id="menu" aria-hidden="true">Contenido del menú</div>

<!-- Etiquetas y descripciones -->
<input type="text" aria-label="Buscar productos"
       aria-describedby="search-help">
<div id="search-help">Ingresa el nombre del producto</div>
Atributos de Accesibilidad Nativa
HTML5 incluye atributos nativos que mejoran la accesibilidad:
<!-- Formularios accesibles -->
<label for="email">Correo electrónico:</label>
<input type="email" id="email" required
       aria-required="true" aria-invalid="false">

<!-- Imágenes con descripción -->
<img src="grafico.png" alt="Gráfico de ventas 2023"
     role="img" aria-describedby="chart-desc">
<div id="chart-desc">Muestra un aumento del 15% en ventas</div>

<!-- Navegación semántica -->
<nav aria-label="Navegación principal">
  <ul role="menubar">
    <li role="none"><a href="/" role="menuitem">Inicio</a></li>
    <li role="none"><a href="/about" role="menuitem">Acerca</a></li>
  </ul>
</nav>
Opinión y Mejores Prácticas
La accesibilidad no es opcional, es un derecho. Implementar
atributos de accesibilidad correctamente no solo beneficia a
usuarios con discapacidades, sino que mejora la experiencia para
todos. Siempre prueba con lectores de pantalla y valida tu código
con herramientas como axe-core. Recuerda: "Si no es accesible, no
es profesional."
Usa roles ARIA solo cuando sea necesario
Proporciona texto alternativo descriptivo en imágenes
Implementa navegación por teclado
Valida la accesibilidad regularmente
Considera la experiencia de usuarios con diferentes capacidades
Los atributos de eventos permiten ejecutar JavaScript directamente
desde HTML cuando ocurren interacciones específicas del usuario.
Aunque no son la práctica más moderna, son fundamentales para
entender cómo funciona la interacción entre HTML y JavaScript.
Eventos de Interacción Comunes
Los eventos más utilizados para crear interactividad básica:
<!-- Eventos de mouse -->
<button onclick="alert('¡Hola!')">Hacer clic</button>
<div onmouseover="this.style.backgroundColor='yellow'"
     onmouseout="this.style.backgroundColor='white'">
  Pasa el mouse aquí
</div>

<!-- Eventos de teclado -->
<input type="text" onkeyup="console.log('Tecla presionada')"
       onkeydown="if(event.key==='Enter') alert('Enter presionado')">

<!-- Eventos de formulario -->
<form onsubmit="return validarFormulario()">
  <input type="email" onblur="validarEmail(this)">
  <button type="submit">Enviar</button>
</form>
Eventos de Carga y Estado
Eventos que se ejecutan durante el ciclo de vida de la página:
Aunque los atributos de eventos funcionan, la separación de
responsabilidades es clave en desarrollo moderno. Prefiere
addEventListener() en JavaScript puro o frameworks modernos. Los
atributos de eventos son útiles para prototipado rápido, pero para
aplicaciones serias, mantén el JavaScript separado.
Usa para prototipos rápidos, no en producción
Separa JavaScript del HTML cuando sea posible
Considera la accesibilidad en eventos de teclado
Evita código JavaScript complejo en atributos
Prefiere addEventListener() para mejor mantenibilidad
Conocer la sintaxis HTML es solo el primer paso. La verdadera
maestría viene de saber cuándo y cómo aplicar cada elemento
correctamente. Los casos de uso reales te enseñan a pensar como
desarrollador y a crear código que realmente funcione.
El HTML semántico no es solo una moda, es la base de una web
accesible y mantenible. Cada etiqueta tiene un propósito
específico, y usarla correctamente mejora tanto la experiencia del
usuario como el SEO. Recuerda: "HTML es para estructura, CSS para
presentación, JavaScript para comportamiento."
Usa etiquetas semánticas apropiadas
Implementa accesibilidad desde el inicio
Valida tu HTML regularmente
Mantén la estructura lógica y jerárquica
Considera la experiencia en diferentes dispositivos
Las reglas CSS son los bloques fundamentales que definen cómo se
ven los elementos HTML. Cada regla consta de un selector y una
declaración, permitiendo aplicar estilos de manera precisa y
mantenible.
Estructura de una Regla CSS
Una regla CSS completa tiene la siguiente estructura:
selector {
  propiedad: valor;
}
Componentes Principales
Cada regla CSS contiene elementos esenciales:
Selector: Define qué elementos se estilizan
Propiedades: Qué aspecto se modifica
Valores: Cómo se modifica el aspecto
Declaraciones: Combinación de propiedad y valor
Tipos de Selectores
Los selectores determinan qué elementos se ven afectados:
/* Selector de elemento */
h1 { color: blue; }

/* Selector de clase */
.titulo { font-size: 24px; }

/* Selector de ID */
#header { background: gray; }

/* Selector descendente */
div p { margin: 10px; }

/* Selector de atributo */
input[type="text"] { border: 1px solid #ccc; }
Propiedades y Valores
Las propiedades definen qué aspecto cambiar, mientras que los
valores especifican cómo cambiarlo:
.boton {
  background-color: #007bff;  /* Color de fondo */
  color: white;              /* Color del texto */
  padding: 10px 20px;        /* Espaciado interno */
  border: none;              /* Sin borde */
  border-radius: 4px;        /* Esquinas redondeadas */
  cursor: pointer;           /* Cursor de mano */
}
Existen varias metodologías o convenciones para nombrar a las
classes en CSS. Entre las principales tenemos a BEM, OOCSS, SMACSS,
SUITCSS, etc.
Estas se utilizan para organizar nuestro código en CSS y ayuda a
mantener CSSs extensos.
¿Qué es BEM?
BEM es una convención o standard para nombrar clases en CSS.
¿Porqué utilizar BEM?
Primero veamos por qué utilizarlo sobre las otras metodologías
mencionadas líneas arriba, es menos confusa que otros métodos
(SMACSS) pero aun nos brinda una buena arquitectura(OOCSS) y con una
terminología que podemos reconocer.
Podemos encontrar 3 beneficios al utilizar BEM:
Comunica propósito o función.
Comunica estructura de compentes.
Proporciona una especificidad baja.
BEM significa:
Blocks
Los bloques son contenedores o el contexto donde están situados
los elementos.
Suelen ser etiquetas semánticas. ejem: (main, section, header,
footer, etc.)
Son independientes de otros bloques/elementos.
Código en CSS:
              .block {

              }
Ejemplo:
              .header {

              }
Elements
Los elementos son parte de un bloque y no tienen significado
semántico fuera de ese bloque.
Los elementos son escritos usando el nombre del bloque conectado
por dos guiones abajo (underscore) a ellos.
Código en CSS:
              .block__element {

              }
Ejemplo:
              .header__navbar {

              }
Modifiers
Los modificadores son un flag en un bloque o un elemento,
se usa para cambiar apariencia, comportamiento o estado.
Ofrecen una gran ventaja: Modularidad.
Al usar modificadores se facilita la
reutilización de código e incentiva a la
programación por componentes.
Codigo en CSS(Modificador de un bloque):
                  .block--modifier {

                  }
ó Modificador de un elemento:
                    .block__element--modifier {

                    }
Ejemplo práctico:
CSS:
                .hero__copy--languages {

                }
Codigo en HTML(Modificador de un bloque):
ó Modificador de un elemento:
Ejemplo práctico:
HTML:
A continuación podemos ver un ejemplo visual de esta metodología:
Puedes ver la aplicación de la metodología BEM en el proyecto de
maquetación del sitio web de la plataforma
CODACY, codeada por el grupo
Bit-Hug. Puedes encontrar BEM en las siguientes secciones del repo/web:
A continuación, las 3 formas de como controlar el orden al
declarar en CSS son (prioridad va de mayor 1. a menor 3.):
Origen e Importancia
Especificidad
Posición / Orden de las fuentes de codigo CSS
Recordar que mientras más alta sea alguna de estas 3 formas, más
alta la relevancia o prioridad será la declaración CSS
Origen e Importancia
Primero se aplican los estilos del navegador
Luego se aplican los estilos de nuestras declaraciones en
nuestros archivos .css
Finalmente se aplican las declaraciones con
!important
Una regla práctica para recordar la importancia de las
declaraciones CSS, es la siguiente:
transitions
user-agent !important
user !important
author !important
animations
author
user
user-agent
Donde la importancia es mayor en 1. y menor en 8.
Notas: Recordar que el uso de !important es
considerado una mala práctica, ya que puede romper nuestros
estilos o llegar al punto de usarlo cada vez que no sepamos como
funciona CSS
Especificidad
inline
id
clases / selectores de atributo / pseudo-clases
tipo / pseudo-elementos
Donde la especificidad es mayor en 1. y menor en 4.
Posición / Orden de las fuentes de codigo CSS
CSS internos (al utilizar la etiqueta <style> dentro de la
etiqueta <head>)
CSS externos (al utilizar la etiqueta <link> haciendo
referencia a un css externo)
Orden en declaraciones CSS
Donde la posicion es mayor en 1. y menor en 3.
Aquí se aplica el algoritmo de Cascada que tiene CSS, las
declaraciones y/o reglas CSS que estén por debajo sobreescribirán
o anularán a las que estén por arriba, en caso de conflicto.
Notas:
También tener en cuenta que al llamar en el archivo .html varios
archivos .css, los de abajo también pueden reescribir a los de
arriba.
El modelo de caja es la base fundamental del diseño CSS. Cada
elemento HTML se comporta como una caja rectangular compuesta por
contenido, padding, borde y margen. Comprender este modelo es
esencial para controlar el espaciado y el layout de tus páginas
web.
Content
Margin
Border
Padding
Content
Componentes del Modelo de Caja
Los cuatro componentes principales que forman cada caja:
El modelo de caja es la piedra angular del CSS. Siempre usa
box-sizing: border-box para evitar sorpresas con los cálculos de
tamaño. El colapso de márgenes puede ser confuso al principio,
pero una vez que lo entiendes, te da control total sobre el
espaciado.
Usa box-sizing: border-box globalmente
Comprende el colapso de márgenes verticales
Usa padding para espaciado interno, margin para externo
Considera el impacto en responsive design
Prueba en diferentes navegadores para consistencia
Flexbox y CSS Grid son las dos herramientas más poderosas para
crear layouts modernos. Aunque pueden parecer similares, cada una
tiene su propósito específico. Flexbox es ideal para componentes
unidimensionales, mientras que Grid es perfecto para layouts
bidimensionales complejos.
Flexbox: Para Componentes
Flexbox es perfecto para alinear elementos en una sola dirección:
/* Navegación horizontal */
.nav {
  display: flex;
  justify-content: space-between; /* Distribuye el espacio */
  align-items: center;           /* Centra verticalmente */
  padding: 1rem;
}

.nav-item {
  flex: 1; /* Crecimiento igual para todos */
}

/* Botón con icono y texto */
.boton {
  display: flex;
  align-items: center;
  gap: 0.5rem; /* Espacio entre icono y texto */
}

/* Card con contenido flexible */
.card {
  display: flex;
  flex-direction: column;
  height: 100%;
}

.card-content {
  flex: 1; /* Ocupa el espacio disponible */
}

.card-footer {
  margin-top: auto; /* Se pega al final */
}
CSS Grid: Para Layouts
Grid es ideal para layouts complejos con filas y columnas:
No son competidores, son complementarios. Usa Flexbox para
componentes individuales (botones, cards, navegación) y Grid para
layouts generales (páginas, secciones). La combinación de ambos te
da control total sobre el diseño. Recuerda: "Flexbox para
componentes, Grid para layouts."
El posicionamiento CSS controla cómo se colocan los elementos en
la página. Desde el flujo normal del documento hasta elementos
flotantes y superpuestos, el posicionamiento es clave para crear
layouts precisos y controlar la jerarquía visual de tus diseños.
Tipos de Posicionamiento
Los cinco valores principales de la propiedad position:
/* Static (por defecto) - Flujo normal */
.elemento-static {
  position: static;
  /* Sigue el flujo normal del documento */
}

/* Relative - Relativo a su posición original */
.elemento-relative {
  position: relative;
  top: 10px;    /* Se mueve 10px hacia abajo */
  left: 20px;   /* Se mueve 20px hacia la derecha */
  /* Mantiene su espacio en el flujo */
}

/* Absolute - Relativo al contenedor posicionado más cercano */
.elemento-absolute {
  position: absolute;
  top: 0;
  right: 0;
  /* Se saca del flujo normal */
}

/* Fixed - Relativo al viewport */
.elemento-fixed {
  position: fixed;
  bottom: 20px;
  right: 20px;
  /* Siempre visible, no se mueve con el scroll */
}

/* Sticky - Híbrido entre relative y fixed */
.elemento-sticky {
  position: sticky;
  top: 0;
  /* Se comporta como relative hasta llegar a top: 0 */
}
Z-Index y Stacking Context
Controla la superposición de elementos con z-index:
/* Z-index básico */
.modal {
  position: fixed;
  top: 0;
  left: 0;
  width: 100%;
  height: 100%;
  background: rgba(0, 0, 0, 0.5);
  z-index: 1000; /* Por encima de otros elementos */
}

.modal-content {
  position: relative;
  z-index: 1001; /* Por encima del fondo del modal */
}

/* Stacking context */
.contenedor {
  position: relative;
  z-index: 1; /* Crea nuevo contexto de apilamiento */
}

.elemento-hijo {
  position: absolute;
  z-index: 10; /* Solo se compara con otros elementos del mismo contexto */
}

/* Float y clear */
.imagen-float {
  float: left;
  margin-right: 1rem;
}

.texto {
  clear: both; /* Evita que el texto se envuelva alrededor del float */
}
Opinión y Mejores Prácticas
El posicionamiento es una herramienta poderosa pero puede volverse
complejo rápidamente. Usa position: relative para ajustes menores,
absolute para overlays y modales, y fixed para elementos que deben
permanecer visibles. Evita z-index muy altos y considera usar CSS
Grid o Flexbox para layouts modernos.
Usa relative para ajustes menores de posición
Absolute para elementos superpuestos
Fixed para elementos que deben permanecer visibles
React es una biblioteca de JavaScript desarrollada por Facebook
para construir interfaces de usuario interactivas y reutilizables.
Su enfoque basado en componentes y el Virtual DOM la convierten en
una herramienta poderosa para el desarrollo frontend moderno.
Características Principales
React se destaca por sus características únicas:
Componentes: Bloques reutilizables de UI
Virtual DOM: Optimización del rendimiento
JSX: Sintaxis que combina HTML y JavaScript
Unidireccional: Flujo de datos predecible
Ecosistema: Herramientas y librerías
complementarias
Opinión y Mejores Prácticas
React revolucionó el desarrollo frontend al introducir el concepto
de componentes reutilizables y el Virtual DOM. Su curva de
aprendizaje es moderada, pero una vez dominado, permite crear
aplicaciones escalables y mantenibles. La clave está en entender
el flujo de datos unidireccional y aprovechar el ecosistema de
herramientas.
Comienza con componentes funcionales
Entiende el flujo de props y state
Practica con JSX y eventos
Explora el ecosistema de herramientas
Mantente actualizado con las últimas características
Los elementos son la unidad más pequeña de React, mientras que los
componentes son funciones o clases que devuelven elementos. Esta
distinción es fundamental para entender cómo React construye la
interfaz de usuario de manera eficiente y reutilizable.
Elementos vs Componentes
La diferencia clave entre elementos y componentes:
// Elemento - descripción de lo que quieres ver
const element = <h1>Hola, mundo!</h1>;

// Componente - función que devuelve elementos
function Saludo() {
  return <h1>Hola, mundo!</h1>;
}

// Componente con props
function SaludoPersonalizado({ nombre }) {
  return <h1>Hola, {nombre}!</h1>;
}

// Uso del componente
const elemento = <SaludoPersonalizado nombre="React" />;
Tipos de Componentes
React ofrece diferentes formas de crear componentes:
// Componente funcional (recomendado)
function MiComponente() {
  return <div>Componente funcional</div>;
}

// Componente de clase
class MiComponenteClase extends React.Component {
  render() {
    return <div>Componente de clase</div>;
  }
}

// Componente con arrow function
const MiComponenteArrow = () => {
  return <div>Componente arrow</div>;
};
Opinión y Mejores Prácticas
Los componentes funcionales son el futuro de React. Son más
simples, tienen mejor rendimiento y son más fáciles de testear. La
clave está en mantener los componentes pequeños, enfocados en una
sola responsabilidad y bien documentados.
Los estados (state) y props son los dos pilares fundamentales para
manejar datos en React. Los props permiten pasar datos de
componentes padre a hijo, mientras que el state maneja datos
internos que pueden cambiar durante el ciclo de vida del
componente.
Props - Datos Inmutables
Los props son datos que se pasan de componente padre a hijo:
La gestión correcta de state y props es crucial para aplicaciones
React escalables. Siempre eleva el state al componente común más
cercano y usa props para comunicación entre componentes. Recuerda
que los props son inmutables y el state debe actualizarse con
setState o hooks.
Los hooks avanzados van más allá de useState y useEffect,
ofreciendo funcionalidades específicas para casos de uso
complejos. Hooks como useMemo, useCallback, useRef y useContext
permiten optimizar rendimiento y manejar casos avanzados de manera
elegante.
Los hooks avanzados son herramientas poderosas que requieren
comprensión profunda de cuándo y cómo usarlos. No abuses de la
optimización prematura; primero mide el rendimiento real antes de
aplicar useMemo o useCallback. La clave está en entender el ciclo
de vida de React y los casos de uso específicos.
Usa useMemo para cálculos costosos
useCallback para funciones que se pasan como props
El ciclo de vida en React describe las diferentes fases por las
que pasa un componente desde su creación hasta su destrucción. Con
la introducción de hooks, el manejo del ciclo de vida se ha
simplificado, pero sigue siendo fundamental entender cuándo y cómo
se ejecutan las diferentes fases.
useEffect - El Hook del Ciclo de Vida
useEffect reemplaza los métodos de ciclo de vida de las clases:
import { useState, useEffect } from 'react';

function UsuarioPerfil({ usuarioId }) {
  const [usuario, setUsuario] = useState(null);
  const [cargando, setCargando] = useState(true);

  // Equivalente a componentDidMount
  useEffect(() => {
    console.log('Componente montado');

    // Cargar datos del usuario
    fetch(`/api/usuarios/${usuarioId}`)
      .then(response => response.json())
      .then(data => {
        setUsuario(data);
        setCargando(false);
      });
  }, [usuarioId]); // Dependencias

  // Equivalente a componentDidUpdate
  useEffect(() => {
    if (usuario) {
      console.log('Usuario actualizado:', usuario.nombre);
    }
  }, [usuario]);

  // Equivalente a componentWillUnmount
  useEffect(() => {
    return () => {
      console.log('Componente desmontado');
      // Limpiar suscripciones, timers, etc.
    };
  }, []);

  if (cargando) return <div>Cargando...</div>;

  return (
    <div>
      <h1>{usuario.nombre}</h1>
      <p>{usuario.email}</p>
    </div>
  );
}
Fases del Ciclo de Vida
Las principales fases del ciclo de vida:
Montaje: Componente se crea y se inserta en el
DOM
Actualización: Componente se re-renderiza por
cambios
Desmontaje: Componente se elimina del DOM
Manejo de Errores: Captura errores en el árbol
de componentes
Opinión y Mejores Prácticas
El ciclo de vida moderno con hooks es más predecible y fácil de
entender que los métodos de clase. La clave está en entender las
dependencias de useEffect y cuándo usar cada variante. Siempre
limpia los efectos secundarios para evitar memory leaks.
React Fiber es el algoritmo de reconciliación que React usa para
determinar qué cambios necesita hacer en el DOM. Introducido en
React 16, Fiber permite interrumpir el trabajo de renderizado para
priorizar actualizaciones más importantes, mejorando
significativamente el rendimiento y la experiencia de usuario.
Características de Fiber
Las principales características del algoritmo Fiber:
Interrumpible: Puede pausar y reanudar el
trabajo
Priorizable: Asigna prioridades a diferentes
tipos de actualizaciones
Reutilizable: Puede reutilizar trabajo previo
Incremental: Divide el trabajo en chunks
pequeños
Fases del Renderizado
Fiber divide el renderizado en dos fases principales:
// Fase 1: Render/Reconciliación (interrumpible)
function Componente() {
  const [contador, setContador] = useState(0);

  // Esta fase puede ser interrumpida
  const elementos = (
    <div>
      <h1>Contador: {contador}</h1>
      <button onClick={() => setContador(c => c + 1)}>
        Incrementar
      </button>
    </div>
  );

  return elementos;
}

// Fase 2: Commit (no interrumpible)
// Aquí se aplican los cambios al DOM
Beneficios del Fiber
Los principales beneficios del algoritmo Fiber:
Mejor rendimiento: Evita bloqueos del hilo
principal
Priorización: Actualizaciones urgentes se
procesan primero
Concurrent Mode: Permite renderizado
concurrente
Suspense: Manejo elegante de carga asíncrona
Opinión y Mejores Prácticas
React Fiber representa una evolución fundamental en cómo React
maneja el renderizado. Aunque es transparente para la mayoría de
desarrolladores, entender sus conceptos ayuda a escribir código
más eficiente. La clave está en aprovechar las características
concurrentes y mantener componentes puros.